SharePoint Framework Developer Preview Release – Where do I begin?

This is an exciting time! The much anticipated SharePoint Framework Preview was released yesterday. And guess what … they are essentially Add-ins /Apps. Right now just the web parts piece is released and the end result is an improvement over app parts. The most noteworthy part is that the web parts are now on the page as opposed to being inside of an iframe! They have a couple more improvements like being able to be fully responsive, having web part properties. They mention that new developments will be added frequently and they are targeting a release time frame of early 2017.

The biggest hurdle that I can see for traditional SharePoint developer is the tooling.  If you are not comfortable with using a command line, Node.js, NPM, Yeoman or Gulp then you should invest a large chunk of time to familiarize yourself with those technologies. I believe that having a base knowledge of the “What” is actually happening when you type “yo @microsoft/sharepoint” is important.  Most modern day front end web developers are already comfortable with these things. For the traditional SharePoint developer most of these things will be foreign and seemingly difficult to grasp at first (for some).

So you’ve visited the SharePoint Framework Developer Preview Release git-hub and you’re following the steps but you find yourself scratching your head. What did you miss? What is all this stuff?  Where do you begin to even get started?

First off don’t feel bad.. most people are seeing this for the first time just like you.

<rant> Just the other day I discussed the front end development build process of node/gulp/npm to other day to our Senior SharePoint developers and even they were confused. Some even got pissed off and mad at Microsoft. I can remember the comments clearly, “COMMAND LINE? What year is this?”. I’ve embraced the change and I can see the good things that can come out of it.  Getting back to point of this article. </rant>

I recommend that you take the time to learn about the new tools that they are asking us to adopt. There are ton’s of free online resource on YouTube alone… However if you have or can get your job to pay for a Pluralsight you will access to premium content with some of the top authors (this will be more important for the SharePoint work)

Online resources (free) to help you get familiar with for Node/Gulp/TypeScript/Yeoman

  • Node.js Fundamentals
  • NodeJS – NPM Package Manager – Tutorial 2
  • Gulp.js Build System #1 – Fundamentals
  • Gulp – The Basics
  • TypeScript/ES6 Module Syntax Intro
  • Yeoman – Read first paragraph
  • If you haven’t even started to develop apps or client side web parts using JavaScript then you need to take a look at resources geared towards connecting to SharePoint lists and libraries using the REST end points or the client side JavaScript object model. There are some course that I highly recommend. 

    Pluralsight Courses for SharePoint Client Object Model

  • David Mann
  • http://www.pluralsight.com/courses/developing-sharepoint-2013-javascript
  • http://www.pluralsight.com/courses/developing-sharepoint-2013-javascript-part2
  • http://www.pluralsight.com/courses/developing-sharepoint-2013-javascript-part3
  • Rob Windsor
  • http://www.pluralsight.com/courses/sharepoint-2013-client-object-model-rest
  • Rob Windsor, & Sahil Malik
  • http://www.pluralsight.com/courses/sp2010-client-object-model
  • Can I just use Visual Studio? PLEASE!@#!@ Do I need to learn all the front end tooling?

    The framework can be intimidating for the people not comfortable with the technologies listed. For the most part you really just need to learn a couple of things and you can get by. TypeScript is not one of those things. Good news for those most comfortable working in Visual Studio. They have documentation on how to get setup via Visual Studio 2015 (Update 3) here.  The bad news is that is still uses Node.js and the Gulp build tasks to compile and build the project. We will just have to wait and see if the process is improved with future releases.

    Ok I got all that…

    After you’ve covered all this then you should walk through the examples. The documentations is very good at explaining how to get everything installed and get up and running with your first Hello World web part. My only piece of advice is to read through everything 1 step at a time. It took me a few reads before I was able to get the first web part to load inside SharePoint.

    Final Thoughts:

    • Get an Office 365 Developer Account
    • Learn the fundamental technologies in play – Node.js, Gulp, Yeoman, Node Package Manager (npm)
    • Become a TypeScript master
    • Changes, Updates, Fixes will be coming frequently with a release time frame of 2017 (so they say)
    • Preview is missing a few things that a traditional deployment would have
      • Examples on how to deploy files to SharePoint / not CDN
      • Examples on how to deploy assets (List Definitions, Content Types, Site Columns) => Notes on Solutions Packaging

    Bootstrap Navigation for Office 365 & SharePoint 2013 using jQuery and REST

    Introduction

    In my last post I talked about making the SharePoint navigation render in a Bootstrap friendly way. I suggested that you could do this by changing the markup of the navigation using an ASP:Repeater to display the nodes. This works great if you’re on an on-prem environment but on Office 365 you cannot use this method because the masterpage cannot contain code blocks. If you haven’t read that it might be worth taking a look at – Bootstrap Responsive Navigation in SharePoint .

    This post will demonstrate an Office 365 safe version that use JavaScript, jQuery, and REST to retrieve the navigation from SharePoint’s navigation provider. Once we have that we’ll render that out to the screen client side. With this approach we can use the out of the box Managed Meta Data navigation provider for the navigation, and we can control the exact rendering so that it fits Bootstrap’s model for a navigation bar.

    The code can be downloaded directly from my git-hub account – https://github.com/tom-daly/sp2013-bootstrap-nav

    Getting Started

    It’s very simple to get started you only need to do a few things.

    1. Add the link to the topNavigation.js in your SharePoint masterpage

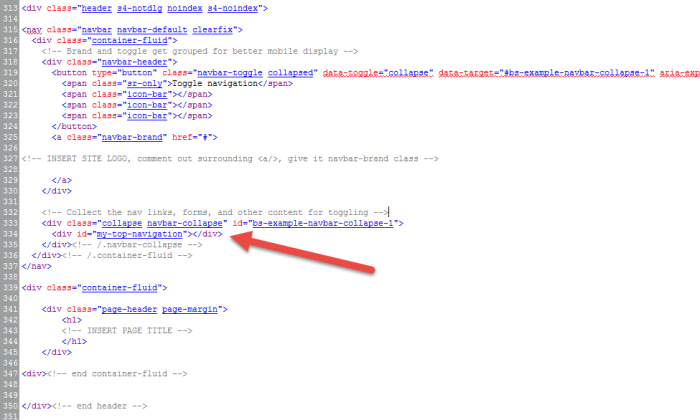
    1. In the Master Page, add the container below where the navigation will be pushed into. You will need to determine where you want the navigation to go, I’ll have a full example at the very end.

    1. Switch the SharePoint Navigation to use the Managed Meta Data Navigation
      1. In Site Settings
      2. Look and Feel -> Navigation

    Once you complete those steps you’ll have your navigation displayed in that container.

    Other Details

    Changing Rendering

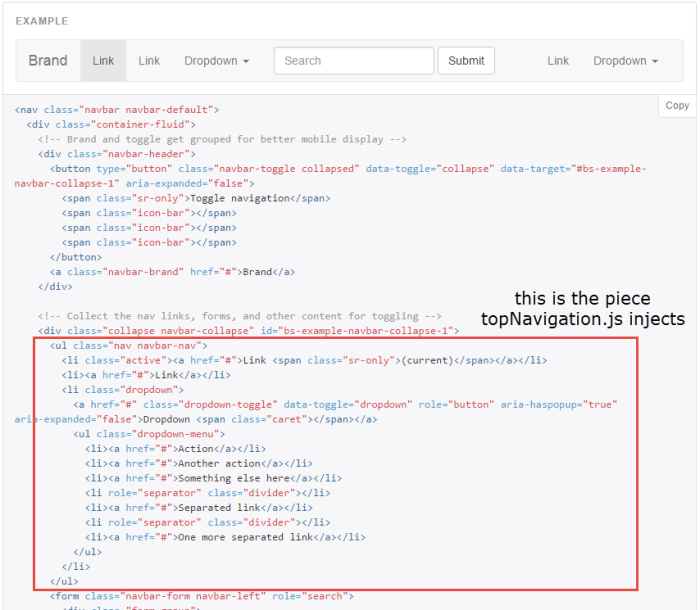
    The rendering of the menu is defined in the renderNavigationNodes function. This is currently the format the Bootstrap likes. If you visit the Bootstrap website and take a look at the first example

    http://getbootstrap.com/components/#navbar

    The red box is exactly what the code is injecting. So you would wrap all that however you want it to appear. Follow the examples there are plenty out there.

    2 Level Flyouts

    Currently this supports only 2 levels, a top level and 1 flyout. This is just what Bootstrap v3.3.5 supports and that’s what I’m sticking with currently. If you want more levels then it’s up to you to figure that part out. It can be done and there are other 3rd parties implementing 3rd or 4th level flyouts after the fact. The code is recursive and will support as many levels as you have, you just need to handle the front end portion.

    The REST Call

    The query that I am using can be seen below. The /web/navigation/topbar endpoint – flat out sucks. It won’t show if a node is hidden and it didn’t behave. This is the only one I could get to work reliably.

    Changing Target Container

    If you want to change where the navigation goes, instead of “#my-top-navigation” then you can edit the topNavigation.js file and at the bottom change the selector to another ID preferably.

    Sample Files

    I have a few more sample files that might be of use to look at.

    Base.css – Sample CSS file (helps with some Bootstrap/SharePoint resets)

    Bootstrap.Master – Sample masterpage used in this example. In this sample I create my own header and not s4-titlerow. Using this html structure you’ll get the collapsible navigation that is popular on most web sites.

    Conclusion

    The whole goal of this script was to have a way for an Office 365 site to use the Bootstrap navigation. Although there are still limitations it’s doable. And you don’t even necessarily need to touch the master page. You could attach the scripts and css via other methods which I won’t go in to. So if you’re an Office 365 purist who doesn’t want to customize the master page you would want to take an approach to this. I hope this helps someone out there. If there are problems with the script you can report the issues through the github page. https://github.com/tom-daly/sp2013-bootstrap-nav/issues

    My Favorite JavaScript Libraries and jQuery plugins

    These are a few of my favorite and go to JavaScript libraries. These tend to work well in SharePoint with no problem. This is my personal list that I use

    Grid

    Console Log

    Glyphs

    Carousel

    Cookies

    Click Outside

    Mutate / Resize

    Select Box (supports Multi)

    Time / Date

    Truncating Text

    Layouts (masonry type)

    Notify / Alerts

    Modal

    Scroll Bars

    SharePoint Specific

    Provision a Workflow to the Host Web from the App Web

    below is some sample code to provision a workflow on the host web from your app web. This sample code is in one block for demo purposes. It makes 4 asynchronous calls to SharePoint to complete successfully.

    In the event you’d want to define in your App a workflow that would run on a list in the host web this is the code you would use to deploy (move it from App to Host) and attach it to a list in the host web.

    NOTE: you must include a reference to “/_layouts/15/SP.WorkflowServices.js”

    this file can be downloaded here

       1: var attachWorkflow = function(workflowName, workflowListName, workflowHistoryListName, workflowTasksListName) {

       2:

       3:      //Using the App Web as the client context

       4:      clientContext = new SP.ClientContext.get_current();

       5:

       6:      //Get the host web URL from the query string params

       7:      //I have a function getHostWebUrl() - which is not included.

       8:      //http://stackoverflow.com/questions/901115/how-can-i-get-query-string-values-in-javascript

       9:      var hostWebUrl = getHostWebUrl();

      10:

      11:      //Using the hostWebContext as an AppContextSite

      12:      hostWebContext = new SP.AppContextSite(clientContext, hostWebUrl);

      13:

      14:      //Get the Workflow Services Manager for the Host web, NOTE: you initialize it with the clientContext & the hostWebContext Web)

      15:      var hostWebWorkflowServicesManager = new SP.WorkflowServices.WorkflowServicesManager.newObject(clientContext, hostWebContext.get_web());

      16:      var hostWebWorkflowDeploymentService = hostWebWorkflowServicesManager.getWorkflowDeploymentService();

      17:      var hostWebSubscriptionService = hostWebWorkflowServicesManager.getWorkflowSubscriptionService();

      18:

      19:      //Get the Workflow Services Manager for the App web 

      20:      var workflowServicesManager = new SP.WorkflowServices.WorkflowServicesManager(clientContext, clientContext.get_web());

      21:      var workflowDeploymentService = workflowServicesManager.getWorkflowDeploymentService();

      22:      var workflowDeploymentServiceDefinitions = workflowDeploymentService.enumerateDefinitions(false);

      23:

      24:      //Load all the Workflow Definitions from the App web

      25:      clientContext.load(workflowDeploymentServiceDefinitions);

      26:      clientContext.executeQueryAsync(function () {

      27:

      28:          //Get the enumerator for all the workflow definitions in the App web

      29:          var workflowDefinitions = workflowDeploymentServiceDefinitions.getEnumerator();

      30:          while (workflowDefinitions.moveNext()) {

      31:

      32:              //set the current definition to a variable

      33:              var workflowDefinition = workflowDefinitions.get_current();

      34:              //test, trying to locate your workflow in the App web

      35:              if (workflowDefinition.get_displayName() === workflowName) {

      36:

      37:                  //now grab the xaml definition of the selected workflow

      38:                  var workflowXaml = workflowDefinition.get_xaml();

      39:

      40:                  //define a new workflow and assign it xaml & name

      41:                  var newWorkflow = new SP.WorkflowServices.WorkflowDefinition.newObject(clientContext, hostWebContext.get_web());

      42:                  newWorkflow.set_xaml(workflowXaml);

      43:                  newWorkflow.set_displayName(workflowName);

      44:

      45:                  //using the host webs Workflow Deployment Service, save the workflow.

      46:                  hostWebWorkflowDeploymentService.saveDefinition(newWorkflow);

      47:

      48:                  //load the new workflow and initialize the Id

      49:                  clientContext.load(newWorkflow, "Id");

      50:                  //this query will save your workflow to the host web

      51:                  clientContext.executeQueryAsync(function() {

      52:

      53:                      //publish the workflow on the host web

      54:                      hostWebWorkflowDeploymentService.publishDefinition(newWorkflow.get_id());

      55:

      56:                      //getting all the lists that the workflow will attach to

      57:                      //these lists already created on the host web

      58:                      var targetList = hostWebContext.get_web().get_lists().getByTitle(workflowListName);

      59:                      var historyList = hostWebContext.get_web().get_lists().getByTitle(workflowHistoryListName);

      60:                      var tasksList = hostWebContext.get_web().get_lists().getByTitle(workflowTasksListName);

      61:

      62:                      //loading the lists & initialize the Id

      63:                      clientContext.load(targetList, "Id");

      64:                      clientContext.load(historyList, "Id");

      65:                      clientContext.load(tasksList, "Id");

      66:

      67:                      //this query will publish the workflow and get the required list id's for the next step

      68:                      clientContext.executeQueryAsync(function() {

      69:

      70:                              //creating a new workflow subscription

      71:                              var subscription = new SP.WorkflowServices.WorkflowSubscription(clientContext, hostWebContext.get_web());

      72:

      73:                              //setting some properties of the subscription

      74:                              subscription.set_name(workflowName + "-ItemAdded");

      75:                              subscription.set_enabled(true);

      76:                              subscription.set_definitionId(newWorkflow.get_id().toString());

      77:                              subscription.set_eventSourceId(targetList.get_id());

      78:                              subscription.set_eventTypes(["ItemAdded"]);

      79:

      80:                              subscription.setProperty("TaskListId", tasksList.get_id().toString());

      81:                              subscription.setProperty("HistoryListId", historyList.get_id().toString());

      82:                              subscription.setProperty("FormData", "");

      83:

      84:                              //attaching the subscription to the target list 

      85:                              hostWebSubscriptionService.publishSubscriptionForList(subscription, targetList.get_id());

      86:

      87:                              //this query will execute the creation of the new subscription and adding attaching the subscription to the target list on the host web

      88:                              clientContext.executeQueryAsync(function() {

      89:                                  console.log("Workflow : \"" + workflowName + "\" successfully added to list : \"" + workflowListName + "\"");

      90:                              }, function(sender, args) {

      91:                                  console.log("Workflow : " + workflowName + " not successfully added to list : " + workflowListName);

      92:                                  console.log("<span style='color:red'>Reason : " + args.get_message() + "</span>");

      93:                              });

      94:                          },

      95:                          function(sender, args) {

      96:                              console.log("Failed to get workflow list IDs");

      97:                              console.log("<span style='color:red'>Reason : " + args.get_message() + "</span>");

      98:                          });

      99:

     100:                  }, function(sender, args) {

     101:                      console.log("Failed to create the workflow definition");

     102:                      console.log("<span style='color:red'>Reason : " + args.get_message() + "</span>");

     103:                  });

     104:              }

     105:          }

     106:      }, function (sender, args) {

     107:          console.log("Could not find workflow : " + workflowName);

     108:          console.log("<span style='color:red'>Reason : " + args.get_message() + "</span>");

     109:      });

     110:  };

    Deleting a List on the Host Web from the App Web with JavaScript Object Model (JSOM)

    Below is some sample code of how to delete a list on the host web from the app web via SharePoint JavaScript object model
     
       1: function DeleteList(listName) {

       2:  

       3:     //Using the App Web as the client context

       4:     clientContext = new SP.ClientContext.get_current();

       5:  

       6:     //Get the host web URL from the query string params

       7:     //I have a function getHostWebUrl() - which is not included.

       8:     //http://stackoverflow.com/questions/901115/how-can-i-get-query-string-values-in-javascript

       9:     var hostWebUrl = getHostWebUrl();

      10:     //Using the hostWebContext as an AppContextSite

      11:     hostWebContext = new SP.AppContextSite(clientContext, hostWebUrl);

      12:  

      13:     //get the list using the host web context

      14:     var list = hostWebContext.get_web().get_lists().getByTitle(listName);

      15:     list.deleteObject();

      16:     

      17:     //Always use the context of the app web to do the work or load and executing

      18:     clientContext.executeQueryAsync(function() {

      19:         console.log("Deleted List : \"" + listName + "\"");

      20:     }, function(sender, args) {

      21:         console.log("Failed to delete list : " + listName);

      22:         console.log("<span style='color:red'>Reason : " + args.get_message() + "</span>");

      23:     });

      24:  

      25: }

      26:  

      27: // parameters : List Name

      28: DeleteList("My Test List");

    Provisioning a List on the Host Web from the App Web with JavaScript Object Model (JSOM)

    Below is some sample code of how to provision a list from the app web via SharePoint JavaScript object model

       1: function CreateList(title, url, templateType, hidden) {

       2:  

       3:     //Using the App Web as the client context

       4:     clientContext = new SP.ClientContext.get_current();

       5:  

       6:     //Get the host web URL from the query string params

       7:     //I have a function getHostWebUrl() - which is not included.

       8:     // Some Ideas Here: http://stackoverflow.com/questions/901115/how-can-i-get-query-string-values-in-javascript

       9:     var hostWebUrl = getHostWebUrl();

      10:     //Using the hostWebContext as an AppContextSite

      11:     hostWebContext = new SP.AppContextSite(clientContext, hostWebUrl);

      12:  

      13:     //Create List Code

      14:     var listCreation = new SP.ListCreationInformation();

      15:     listCreation.set_title(title);

      16:     listCreation.set_templateType(templateType);

      17:     listCreation.set_url(url);

      18:  

      19:     //must use the hostWebContext to get the list in that site

      20:     var lists = hostWebContext.get_web().get_lists();

      21:     var list = lists.add(listCreation);

      22:     list.set_hidden(hidden);

      23:     list.set_onQuickLaunch(false);

      24:     list.update();

      25:  

      26:     //Always use the context of the app web to do the work or load and executing

      27:     clientContext.load(list);

      28:     clientContext.executeQueryAsync(function() {

      29:         console.log("Created List : \"" + title + "\"");

      30:     }, function(sender, args) {

      31:         console.log("Failed to create list : " + title);

      32:         console.log("<span style='color:red'>Reason : " + args.get_message() + "</span>");

      33:     });

      34:  

      35: }

      36:  

      37: // parameters : List Name, List Url, Template Type (can be ListTemplateType or Template ID, Hidden)

      38: CreateList("My Test List", "Lists/MyTestList", SP.ListTemplateType.genericList, false);

      39: CreateList("My Test List", "Lists/MyTestList", 171, false);

    Permanently Removing the Recent Node from Quick Launch for SharePoint 2013

    # Update 5/19/2015 – This article is a javascript/css (wsp) based solution.

    A reader Håkan Nilsson has suggested a simple solution to permanently hide the Recent node. 

    • Create an empty SharePoint Group
    • In Site Settings -> Look and Feel -> Navigation, Edit the Recent node in Current Navigation
    • Add your blank group to the Audience field.

    this method is super easy for an end user to implement without deploying a sandbox solution below. But feel free to continue reading if you are interested in that method. 

    Introduction

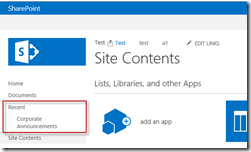
    Yesterday I was tasked to remove the “Recent” node from the quick launch for a customers SharePoint online site. I’ve decided to release the solution in hopes that other people could take advantage of it. The picture below will show you the “Recent” node.

    Recent Node

    This node was undesired by the user because they wanted to have control over the quick launch navigation. They mentioned that every time they add a new list or library then new items will be added under the “Recent” node. When they go and delete it from the Navigation section in Look & Feel, it will just re-appear when they create a new list or library. Basically they wanted it gone.

    Approach

    I chose an approach similar to this blog article http://www.jasperoosterveld.com/2013/02/sharepoint-2013-remove-recent-in-quick.html however, I needed it to work on sandbox for o365 and SPO. I also decided to sharpen my JavaScript Client Object model skills and write a small script that will remove the “Recent” node whenever it is created.

    I paired this with the jQuery as suggested in the article to hide the “Recent” node. Except I made one modification to it you can see below. I’ve added the id #sideBox to have this only search in the Quick Launch. I explain more about why I remove and hide it in the next section.

    this > jQuery(“.ms-core-listMenu-item:contains(‘Recent’)”).parent().hide();

    to this > jQuery(“#sideBox .ms-core-listMenu-item:contains(‘Recent’)”).parent().hide();

    The Solution

    The entire solution & the pre-built .wsp can be downloaded from CodePlex – http://rr.codeplex.com

    The sandbox solution is composed of two components:

    1. RemoveRecent.js – JavaScript Client Object Model code which removes the “Recent” node from the quick launch if detected on page refresh.
    2. HideRecent.js – jQuery code to hide the “Recent” node

    Why remove and hide?

    Since the RemoveRecent.js runs client side there is a case where you may see the “Recent” node. For example you just finished creating a new list and the page refresh. The code to remove the node in RemoveRecent.js is called asynchronously. The list or library is removed from the back end but on the client side is not updated. This could be handled with a refresh but that causes a double refresh once you create a new list and there is a delay between the refreshes. I felt that this created a bad user experience. The answer to that was to also hide the node using HideRecent.js

    Hope this may be useful to some of you out there.

    My Sticky Footer Solution for SharePoint 2013–Pure JavaScript Solution

    Last year I posted a blog article which described the issue with SharePoint 2010 and having a footer. Well similarly SharePoint 2013 has some of the same obstacles when adding a footer. If you are interested in reading more detail into the issue w/ 2010 then go here: My SharePoint 2010 Sticky Footer Solution.

    It basically boils down to these 2 issues:

    1. If you just add a footer to your master page it will be displayed directly under the page content. On a page that has little content then the footer may show half way up the page.
    2. Alternatively if you try a pure CSS sticky footer solution it may not work correctly either because SharePoint uses the page height to calculate where the scroll bars will go (mainly due to the header / ribbon always being at the top).

    [Update 10/9/2013] – Added code from Robert, to handle MDS type pages.

    [Update 9/1/2013] – I noticed that these scripts do not work on Team Sites, this is due to the Minimal Download Strategy Feature that is enabled. Turn that off and this work perfectly fine. I’m still researching how to make the scripts how with that feature enabled.

    I’ve also updated the code to use it’s own function to detect height. Padding (top/bottom) can sometimes throw off the size computations.

    Link the script file

    As you can see below I’ve hosted my file in the Style Library

    <!-- Custom JS -->
    <SharePoint:ScriptLink runat="server"
     Name="~SiteCollection/Style Library/js/stickyFooter.js" 
     Localizable="False"  LoadAfterUI="True"/>

    The Footer Control

    Simply add this div after s4-bodyContainer in the master page file.

    <div class="s4-notdlg noindex" id="Footer">
    &copy; My Footer Solution 2013
    </div>

    As you can see below an export of the DOM from the IE Dev Toolbar.

    footer

    Here below you can see where in the Master Page (based on seattle.master) I look for the id=”DeltaPlaceHolderUtilityContent” and you’ll see 3 </div> above it. I put it right between the 2nd & 3rd </div>

    mp_footer

    The Script File

    Download stickyFooter2013.js Here

    This script is a pure JavaScript solution which will work with a default master page. If you customize it then you’ll need to account for any differences. It basically adds the suite bar + ribbon + body + footer, and if that’s smaller than the viewport aka viewable area. It will expand the body by the difference so that they are equal.

    This also operates in it’s own namespace so there won’t be any collisions

    I also bind to the window resize event so if the size of the screen changes the ribbon should stay on the bottom.

    sf

    Enjoy!

    Customize Table of Contents Web Part: Remove Libraries & Navigation Headers

    This article is based off Thomas Sondergaard’s post located here: http://sharepointsharpener.wordpress.com/2011/09/27/quick-fix-remove-libraries-lists-from-toc/

    This version is slightly different, I approach it similar but in a different way. That version uses javascript and scans all <A> tags on the page, it did not remove the extra items added from Quick Launch navigation.

    My version will remove all the lists and libraries as well as any nodes added from the quick launch navigation, and it specifically targets the table of contents web part only.

    Description

    Standard Table of Content webpart will display all Items in the site and any additional headings and links added in the Quick Launch.

    toc

    It pretty much shows everything that’s in the quick launch.

    nav

    My client had the requirement of a site map type web part for SharePoint Online (o365). So I could not program anything and the Table of Content web part was great because we could sort, but they did not want all this ‘other’ stuff, Libraries & Lists & Navigation Headers, appearing in the site map type webpart. They did want it to appear in the quick launch, so I could not remove it from there. The Table of Content is reading directly from the Quick Launch navigation provider so I was stuck.

    Solution

    Using jQuery I iterate throught all the headers, then I find which ones are list and libraries.

    Lists and Libraries will have an <a> tag which contains ‘BaseType’

    Or I check to see if it’s a standard link and remove that. All the automatically generated one would be relative links. And all the ones added to the quick launch we added as absolute.

    If the section did not contain a link, then it’s detected as a Header from the quick launch nav provider and I remove that.

    Below is the script, I load jQuery via a CDN first. Then I’ll add this to the page in a <script></script> tag. In my actual deployment I added my script to the MasterPage so it would be used site wide.

    jQuery(document).ready(function () {
    
        var url = window.location.pathname;
        jQuery(".toc-layout-main .headermarker").each(function () {
    
            var result = jQuery(this).find("a").each(function () {
                var href = jQuery(this).attr("href");
                if (href.indexOf('BaseType') != -1) {
                    var topNode = jQuery(this).parent().parent().parent().parent();
                    if (topNode.hasClass("level-section")) {
                        topNode.hide();
                    }
                }
                else if(href.indexOf('http') != -1) {
                    var topNode = jQuery(this).parent().parent().parent();
                     if (topNode.hasClass("dfwp-list")) {
                        topNode.hide();
                    }
                }
            });
    
            if (result.length == 0) {
                var topNode = jQuery(this).parent().parent().parent();
                
                if (topNode.hasClass("level-section")) {
                    topNode.hide();
                }
            }
    
        });
    
    });

    That’s it. Your final results should look be reduced to only sites and sub sites.

    result

    Cache Busting Using CssRegistration & ScriptLink in SharePoint 2010

    What is cache busting?

    Cache busting is way to ensure that the browser will download a new version of your file. This is easily accomplished using a simple technique of appending a ? with some unique characters at the end.

    ex:

    <link rel="stylesheet" href="/css/example.css?v1.0" type="text/css" />

    The browser sees this as a different file and will then download and cache this new file. Each time the browser see’s a different string it will download the file and cache it. Some methods use a revision number, a date, random number, or a signature as a query string parameter. Taking a look at the example above you will see a version number is specified at the end of the .css file to do the cache busting.

    SharePoint 2010 uses a technique which involved computing a MD5 hash signature of the file and appending a ?rev={MD5HASH} to the link. This technique works very well because the computed hash won’t change unless you change something in the file.  Also the computed MD5 hash will be unique to ensure that the file will appear new to the browser. For all you super technical people, yes MD5 is not guaranteed to be unique, there is a very very small chance of the hash being the same. This technique of the computed MD5 hash signature is used for both CssRegistration and ScriptLink in SharePoint 2010. If you are interested in more detail then reflect into Microsoft.SharePoint.dll –> Microsoft.SharePoint.Utilities –> SPUtility –> MakeBrowserCacheSafeLayoutsUrl

    Cache busting for CssLink

    When using CssRegistration the files need to be relative to the Layouts folder, more specifically LAYOUTS\1033\STYLES\{CssFile}.

    image

    image

    If you do not keep the files in the LAYOUTS\1033\STYLES then you will receive an error

    image

    Below is the rendered html output of the CssRegistration tag above

    image

    You can see that “/_layouts/1033/styles/” is prepended to the ‘Name’ property provided in the CssRegistration tag and your .css file is successfully cache safe.

    Cache busting for ScriptLink

    When using ScriptLink the files need to be relative to the Layouts folder. Unlike the CssRegistration, ScriptLink has a property called ‘Localizable’.  In the asp tag below I specify Localizable=”False”

    If you don’t specify Localizable=”False” then you need to put the files relative to the Layouts\1033 folder.

    image

    image

    Below is the rendered html output of the ScriptLink tag above

    image

    You can see that the “/_layouts/” is prepended to the ‘Name’ property provided in the ScriptLink tag and your .js file is successfully cache safe.

    What if I am deploying files to the Style Library?

    In the scenario where you are deploy CSS to the Site Collection style library then there is no automated way of using the SharePoint cache busting from the CssLink, however you can take a look at Chris O’Brien’s posting – Avoiding bugs from cached JavaScript and CSS files in SharePoint. In this posting he has a solution in which he creates a new class inheriting from CssLink and adds his own mechanism of cache busting. He also mentions that there is no equivalent way to do the same for JavaScript files stored in the content db.

    Summary

    SharePoint 2010 provides an easy way to do cache busting on CSS and JS files stored in the LAYOUTS folder.

    If you store your files in the ‘Style Library’ or content DB then you have to revert to manual methods or get creative with your own solutions.